How Nonprofits Can Create Professional Videos at Home

Marketing, Comms and Brand Manager
LinkedIn for Nonprofits
Video content is one of the most powerful tools nonprofit marketers have in their toolkit. Video can reach people in a way that in-depth articles and reports often can’t, fostering empathy and driving action. One study conducted by Google found that 57% of the people who watch a nonprofit’s video go on to donate—and video content generates 12 times more shares on social media than text and images combined.
If you’re currently working from home with a small budget and limited resources, creating great videos might seem out of reach. Luckily, when people think about videos put out by nonprofits, they think about impactful stories and inspiring messages, not flashy effects. It can be as simple as someone talking to the camera about the work your team is doing or how your nonprofit has helped them. It’s the words that count.
To help you get started, here are some tips for producing high-quality video content from anywhere, and on any budget. Feel free to send this resource to other employees, volunteers, board members, or other people who are helping you create your videos!
Use what you’ve got at hand
If the full extent of your video-producing equipment is presently being used to read this post, that’s okay. You don’t have to buy a fancy camera to start shooting video—a smartphone held steady on a makeshift stand or even your computer’s built-in webcam will do.
One benefit of this thrifty approach is that you probably don’t have to spend a lot of time getting familiar with your equipment. Chances are, you’ve recorded a video with your phone before or used your webcam for a meeting. So, rather than wasting hours reading instructions and learning how to use a new camera, you can dive right in.
Set the scene
You don’t need to be sitting in a chic studio to make your videos look good. All you really need is an uncluttered backdrop, whether it’s a corner of your living room or even the wall behind your desk.
While you don’t want your background to be distracting, you also don’t want it to be boring (think: a plain white void). A painting, potted plant, or bookcase can make the shot look more interesting, without detracting from what you’re trying to say.
Keep it light
We’ve all seen professional photographers and videographers use various lighting fixtures, meters, umbrellas, and other gadgets to get the lighting just right. Don’t get intimidated: nobody expects you to be able to recreate that finely tuned set-up from home. But you don’t want viewers squinting to make you out in a dark room, either.
Professional video lights, like an LED light, can give you that soft, natural glow, no matter where you shoot in your home. For more on this, Wistia published an informative makeshift lighting primer. But you don’t have the budget for professional lighting equipment, just make sure that you’re lit from the front by a decent lamp or an entirely free light source: the sun!
For hard-to-get-rid-of glares, try draping a light sheet or two over the window. Just play around until your space is lit to your liking. If the shot comes off as clear and comprehensible to you, it’ll most likely look good to your audience. If you’re still not sure, consider asking a trusted colleague for their opinion.
Don’t let background noise upstage you
Professional equipment can boost sound quality, but it’s not a prerequisite. You can capture quality audio without an expensive microphone.
The key is to make sure your microphone is close enough to the subject. If you have access to a second smartphone—or can convince a housemate to part with theirs for a bit—consider dangling the second phone directly above the subject (and outside the frame of course) and recording sound via the voice memo function.
When you create the final cut, use the voice memo audio instead of the audio from your video. Clap once when you start recording to make it super easy to sync the higher quality sound from your voice memo.
Also, beware of humming and buzzing in the background. We get accustomed to certain noises at home, like those coming from our washing machines and air conditioning units. We might not notice them when we’re shooting, but supporters watching the video might. These subtle sounds can make your words harder to hear and could be annoying for people listening through headphones, so turn off any equipment that’s making noise. If it’s hot in your room, keep a fan handy to quickly cool off between takes, rather than leaving the AC running while you’re recording.
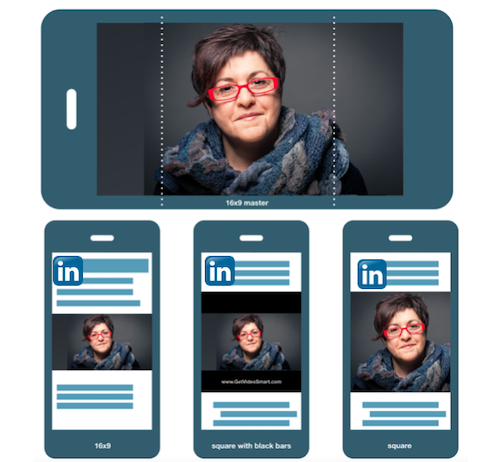
Plan your aspect ratio in advance
While there seems to be a general trend toward more vertically-oriented video, a good case can be made for all three aspect ratios. It depends on what you’re trying to convey and how your audience will be viewing the video. Most social networks are compatible with all three orientations.
To determine which option is best for you, turn to your analytics. If most people are viewing your nonprofit’s content from a desktop device, you might consider horizontal. If your audience is more likely to view your videos from their mobile device, you might consider going with a square or vertical orientation. The device shouldn’t be the only driver of this decision, though. You’ll want to weigh effectiveness metrics as well.
For LinkedIn in particular, blogger Julian Mather recommends that marketers “shoot horizontally and keep the important content contained with a square section of your frame so you can have the three options shown below.”
Include subtitles
On most social media channels, including LinkedIn, the default is for videos to autoplay without sound. Some people will click to turn on the sound, but it’s best to assume they won’t. Here’s how to add closed captions to videos on LinkedIn.
By using subtitles, you allow your audience to experience the audio portion without the sound, making it much easier to not just capture attention, but more importantly hold it during a silent viewing. This also increases accessibility, allowing supporters who are hearing impaired to get the full experience.
Set aside time for pre-production
Unless you’re already well-versed in creating video content, a little stage fright is perfectly normal when you first get in front of the camera.
To put your mind at ease, it’s a good idea to make notecards with bullet points detailing what you want to cover in the video. That way, you can review your cards between takes if your mind goes blank, and you can ensure you’ve covered everything you need to be before turning off the camera. This is often better than reading from a full script, as this can come across as unnatural (plus, it takes longer to write!).
Refine your story with editing
Smartphone video editing keeps improving, and the editing tools that come standard with the video apps on your phone can work just fine for those casual videos where polish isn’t expected and doesn’t add much to the user experience.
But if you’re spending more than a few minutes editing, you’ll probably want to edit on your desktop. There are dozens of video editing software programs to choose from, many of which you can use or trial at no cost. These same programs can make it easy to overlay visual storytelling elements like graphics, people, and text, all of which can extend viewers’ attention.
Grab attention quickly
When both planning and editing your video, ask yourself if you’re giving your audience members enough within the first 10 seconds to entice them to watch the rest of the video.
With the scrolling nature of social media, a few seconds is typically all you have to convince someone to stop and stay awhile. So, make sure that within the first 10 seconds, you give viewers a good reason to keep watching—like highlighting an eye-catching statistic or a heartwarming detail of the story they’re about to hear.
Shoot for succinct
Longer videos can work just fine depending on your objective, but generally, people prefer shorter videos. An internal 2018 study by LinkedIn found that videos under 30 seconds reported a 200% lift in view completion rates. Aiming for short and sweet videos like this also makes your job simpler from a filming standpoint, and can make it easier to get support from others (after all, it’s a smaller ask to request a clip of someone talking for 30 seconds vs. 30 minutes).
If you’ve edited until you can edit no more and your video still feels too long, think about how you might parse it into bite-sized segments. Maybe it could be multi-part series. Or, perhaps you could break it up into multiple stories that run consecutively on Instagram.
Lights, camera, action!
You’re all set to produce professional, compelling video content from the comfort of your living room!
As you start sharing video content on social media and seeing the reaction from your audience, you might decide you want to extend your reach even further. To learn more about how LinkedIn for Nonprofits can help your organization achieve its marketing goals, reach out to one of our nonprofit consultants.